

Edible images on cookies are printed food-safe sheets applied directly onto a moist icing or chocolate surface to transfer a photo, logo, or graphic onto a cookie. The industry term for this product is an edible image sheet or edible frosting sheet, and both terms describe the same thin, flexible substrate printed with food-grade CMYK ink. Bakers use royal icing and white chocolate as the two most reliable base layers because both create the wet, adhesive surface the sheet needs to bond. Getting the technique right requires the correct image file specs, proper cookie preparation, and careful handling. This guide covers every step, from gathering your materials to troubleshooting the most common problems.
What do you need to apply edible images on cookies?
The right materials make the difference between a crisp, professional result and a blurry, peeling disappointment. Gather everything before you start so the process stays controlled.
Core supplies
- Edible image sheets (frosting sheets or wafer paper, depending on your preference)
- Royal icing or melted white chocolate for the base layer
- Small offset spatula or food-safe brush for smoothing
- Sharp scissors or a craft knife for trimming sheets to size
- Edible glue or a light brush of water for edge touch-ups
- Parchment paper to rest finished cookies without sticking
Image file requirements
Getting your digital file right before printing is the single most important step. High-resolution files at 300 DPI prevent pixelation and produce crisp, clean prints. Submit images in JPG or PNG format, and keep file size under 4 MB for reliable upload and print results.
| Spec | Requirement |
|---|---|
| Resolution | 300 DPI minimum |
| File format | JPG or PNG |
| File size | Under 4 MB |
| Background color | White or light-colored |
Pro Tip: Always use a white or light background in your image file. Dark backgrounds tend to print grainy and reduce color accuracy significantly.
One legal detail bakers often overlook: you must own or have authorization to use any image you submit for printing. Bakeries and print services reserve the right to refuse orders containing copyrighted or offensive content. Using original photos or licensed graphics keeps your orders moving without delays.
Custom edible image printing services typically cost between $10 and $20 per A4 sheet. Pre-decorated cookies with custom photo designs often start at $60 per dozen. Knowing these price points helps you budget accurately before ordering.
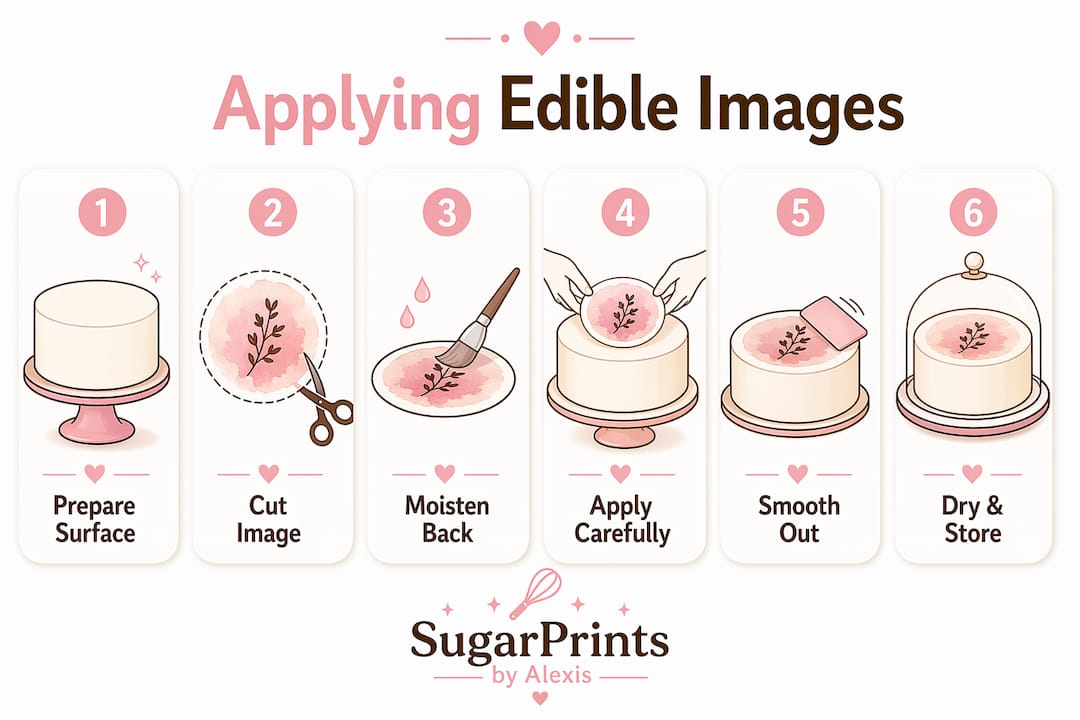
How do you apply edible images step by step?
The application process is straightforward once your cookie surface and image sheet are ready. Rushing any step creates wrinkles, air bubbles, or misalignment that are difficult to fix after the sheet sets.
-
Flood and level your cookie. Apply a smooth layer of royal icing or melted white chocolate across the entire cookie surface. Use an offset spatula to create an even, flat base with no ridges or gaps.
-
Let the surface reach the right stage. The icing should be wet but not runny. A skin that is still tacky to a light touch is ideal. If the icing dries completely before you apply the sheet, the image will not bond.
-
Trim the edible sheet. Cut your printed sheet to match the cookie shape using sharp scissors. Work cleanly and avoid tearing the edges, since ragged edges show on the finished cookie.
-
Peel the backing carefully. Peeling edible sheets from their backing requires a slow, steady hand to prevent tears. Hold the sheet by one corner and peel the backing away rather than pulling the sheet off the backing.
-
Place the sheet on the wet surface. Lay the image face-up onto the icing, starting from one edge and lowering it gradually to avoid trapping air underneath.
-
Smooth from the center outward. Use a clean, dry fingertip or a soft brush to press the sheet gently from the center toward the edges. This pushes out any air pockets and seats the image firmly against the icing.
-
Trim any overhang. If the sheet extends past the cookie edge, trim it with a sharp knife or scissors while the icing is still soft enough to allow clean cuts.
-
Allow the cookie to dry undisturbed. Set finished cookies on parchment paper in a single layer. Avoid stacking or covering them until the icing has fully set.
Pro Tip: Work with one cookie at a time. Royal icing develops a dry skin faster than most bakers expect, especially in low-humidity environments. Keeping unused cookies covered with a damp cloth buys you extra working time.
What are the most common edible image problems?
Even experienced bakers run into issues with edible frosting sheets. Knowing what causes each problem makes fixing it much faster.
-
Colors look different from the screen. Edible ink uses CMYK color, while screens display RGB. Exact color replication is impossible because of this fundamental difference. Expect some shift in saturation and hue, particularly with deep reds, purples, and bright blues.
-
Image looks grainy or pixelated. Low-resolution files and dark backgrounds are the two leading causes. Resubmit the image at 300 DPI with a lighter background to improve print clarity.
-
Sheet wrinkles or bubbles after placement. This happens when the icing is either too wet or too dry. Too wet causes the sheet to slide and buckle. Too dry means the sheet cannot bond and lifts at the edges. Aim for a tacky but stable surface.
-
Colors bleed into the icing. Bleeding occurs when the icing is too wet at the time of application. Let the flooded surface rest for a few extra minutes before placing the sheet.
-
Sheet tears during peeling. Edible sheets are fragile, especially in warm or humid conditions. Refrigerate the sheet for five minutes before peeling to firm it up slightly.
Edible images have real technical limits. The substrate, the ink, and the icing surface all affect the final result. Managing expectations early, for yourself and for clients, produces far better outcomes than promising photo-perfect results that the medium cannot deliver. Professional bakers confirm that exact color matches cannot be guaranteed with edible printing.
Proper storage extends the life of your finished cookies. Edible images on cookies last up to a week when stored in a cool, dry place in an airtight container. Avoid refrigerating decorated cookies unless necessary, since condensation softens the sheet and causes colors to run.
Creative ideas for cookie decoration with edible images
Edible frosting sheets work best as one element in a broader decoration plan, not as the only decoration on the cookie. Combining them with other techniques produces results that feel polished and intentional.
-
Layer edible images with hand piping. Apply the sheet to the center of the cookie, then pipe a decorative border in royal icing around the edge. This frames the image and hides any uneven trimming.
-
Use themed graphics for events. Logos, monograms, and event-specific artwork translate well onto edible sheets. Wedding cookies with couple photos, baby shower cookies with nursery graphics, and birthday cookies with personalized text are all strong applications for personalized cookie prints.
-
Match the icing color to the image background. If your image has a white background, flood the cookie with white royal icing. The transition between sheet and icing becomes invisible, making the image look painted directly onto the cookie.
-
Try wafer paper for a different texture. Wafer paper is thinner and more translucent than frosting sheets. It works well on white chocolate bases and creates a slightly different visual effect that some bakers prefer for delicate designs.
-
Order sheets with multiple images per page. Many print services fit several smaller designs on a single A4 sheet. This reduces cost per cookie and lets you mix designs on one order.
Pro Tip: When ordering custom edible toppers for a large event, always order at least 10% more sheets than you need. Edible sheets can tear during handling, and having extras prevents last-minute shortages.
Key Takeaways
Edible images on cookies bond to a moist royal icing or white chocolate surface, and image quality depends directly on file resolution, background color, and careful handling technique.
| Point | Details |
|---|---|
| File resolution matters most | Submit images at 300 DPI in JPG or PNG format to avoid pixelation. |
| Surface timing is critical | Apply the sheet when icing is tacky but not fully dry for reliable adhesion. |
| Color variation is normal | CMYK edible ink cannot replicate RGB screen colors exactly; expect some shift. |
| Light backgrounds print better | White or light-colored image backgrounds produce sharper, more accurate prints. |
| Storage preserves quality | Store finished cookies in an airtight container and expect up to one week of shelf life. |
What I’ve learned from working with edible images
The biggest mistake I see bakers make is treating edible image sheets like stickers. They are not. They are a delicate, food-safe medium with real technical constraints, and the results you get depend almost entirely on the decisions you make before the sheet ever touches the cookie.
Resolution and background color are the two variables that control everything else. I have seen beautiful, high-contrast photos print as muddy, indistinct blobs because the baker submitted a low-resolution file with a dark background. Switching to a clean, white-background version of the same image at 300 DPI produces a result that looks completely different. That one change fixes more problems than any application technique ever will.
The color shift issue trips up beginners and professionals alike. Screens show RGB color, and edible ink prints CMYK. Those two systems do not map to each other perfectly. Reds shift orange, purples shift blue, and bright colors lose some of their punch. Knowing this in advance lets you adjust your design file before printing rather than being disappointed by the finished cookie.
My honest advice for anyone new to this technique: practice on plain cookies before you commit to a client order. Get comfortable with the timing of the icing surface, the feel of peeling the sheet, and the smoothing motion. The technique becomes intuitive quickly, but the first few attempts always reveal something you did not expect.
— Alexis
Custom edible cookie toppers from Sugarprintsbyalexis
Sugarprintsbyalexis creates custom wedding photo cookie toppers and personalized edible icing sheets designed for bakers who want professional results without the guesswork of sourcing and printing on their own. Every topper is crafted from certified edible materials and printed to the resolution standards that produce sharp, vibrant results on royal icing and white chocolate bases.
Whether you are decorating for a wedding, baby shower, or birthday celebration, Sugarprintsbyalexis offers a range of designs and fully custom options. Ordering is straightforward, and the finished sheets arrive ready to apply. For bakers who want to skip the printing setup entirely and go straight to decorating, this is the most direct path to a polished result.
FAQ
What surface do edible images stick to best?
Royal icing and melted white chocolate are the most reliable surfaces. Both create a wet, adhesive base that bonds the edible sheet firmly when the sheet is applied at the right stage of drying.
How long do edible images last on cookies?
Edible images last up to a week when cookies are stored in an airtight container in a cool, dry place. Humidity and condensation are the main causes of early deterioration.
Why do the colors on my edible image look different from my screen?
Edible ink uses CMYK color, while digital screens display RGB. These two color systems differ enough that exact color matching is not possible. Some shift in saturation and hue is normal and expected.
What image resolution do I need for edible printing?
Submit image files at a minimum of 300 DPI in JPG or PNG format. Files above 4 MB may cause upload issues with most print services. Higher resolution files always produce sharper prints.
Can I use any photo for edible image printing?
You must own or have authorization to use any image you submit. Print services reserve the right to refuse orders containing copyrighted material or offensive content. Original photos and licensed graphics are always the safest choice.
Recommended
- CUSTOM WEDDING PHOTO Cookie Toppers: Edible Icing Sheets, Personalized – SugarPrints by Alexis
- Edible Polaroid Style Icing Sheets For Cakes & Cupcakes – SugarPrints by Alexis
- CUSTOM EDIBLE CALENDAR Cake Topper: Digital Download, Printable Burn A – SugarPrints by Alexis
- Wildflower Pressed Flower Cookie Toppers: EDIBLE Floral Wafer Paper or – SugarPrints by Alexis