

Table of Contents
- What You Need to Print Photos on Cookies
- Choosing an Edible Ink Printer for Cookies
- How to Prepare Your Cookie Surface
- Formatting Your Photos for Edible Printing
- Step-by-Step: How to Apply Edible Icing Sheets to Cookies
- Edible Image Troubleshooting: Fixing Bleeding and Smudging
- DIY Printing vs. Professional Custom Toppers
- Conclusion
- Frequently Asked Questions
Last Updated: September 6, 2026
Printing photos on cookies transforms a simple dessert into a personalized centerpiece, but the process involves more than just pressing a picture onto frosting. Edible printing is the technique of transferring food-safe ink onto icing sheets or wafer paper, which you then apply to a prepared cookie surface. This guide walks you through the entire workflow, from selecting an edible ink printer for cookies to troubleshooting common issues like bleeding and smudging. Below, we’ll show you exactly how to achieve crisp, vibrant images that look professional, whether you are a home baker or a party host.
The most common mistake beginners make is skipping surface preparation, which leads to colors bleeding into the frosting. This guide will cover the essential equipment, formatting your digital files for optimal resolution, and the step-by-step application method. We’ll also compare the cost and effort of DIY printing against ordering pre-cut toppers, so you can decide which path fits your event timeline and skill level.
What You Need to Print Photos on Cookies
To successfully print photos on cookies, you need a food-grade printer, edible ink cartridges, and edible paper specifically designed for frosting. Standard inkjet printers are not safe for this task because their inks contain non-food-grade compounds (the FDA). The three primary substrates are frosting sheets, which have a smooth, opaque finish that blends into buttercream or royal icing, and wafer paper, which has a thinner, matte texture that works best on dry surfaces like fondant or chocolate.
Beyond the printer and paper, you will need a few tools to ensure clean application. A sharp pair of scissors or a craft knife helps you cut images precisely to match your cookie shape. Tweezers are useful for handling delicate sheets without transferring oils from your fingers. You also need a dry, cool environment, as humidity is the enemy of edible ink and can cause colors to run before you even place the image.
For those who want professional results without the equipment investment, pre-cut edible icing sheets are a practical alternative. SugarPrints by Alexis offers custom photo toppers that arrive ready to peel and place, eliminating the need for a printer and ink. This option also sidesteps the learning curve of color calibration, which we discuss in the next section.

Choosing an Edible Ink Printer for Cookies
An edible ink printer for cookies is a specialized inkjet printer that uses cartridges filled with food-safe dye, and it is the core investment for any DIY edible printing setup. When selecting a model, prioritize print resolution, which is measured in dots per inch (DPI). A printer that supports at least 1200 DPI will produce sharper images with better color gradients, which is critical when printing detailed faces or text on a small surface.
Most hobbyists start with a converted printer, which is a standard consumer model that has been modified to accept edible ink. These are more affordable but require careful maintenance to prevent clogging. Print head maintenance is a recurring task; you should run a cleaning cycle if the printer sits unused for more than a few days, as dried edible ink can permanently damage the nozzles.
Consider the total cost of ownership, not just the upfront price. Edible ink cartridges are consumables, and their cost varies significantly by brand. FDA guidance on edible food ingredients and color additives clarifies that any ink used must comply with food safety standards, so verify that your cartridges are certified for direct food contact. If you only print occasionally, the cost of ink expiring before you use it can exceed the price of ordering custom toppers from a professional service.

How to Prepare Your Cookie Surface
The ideal cookie base for edible images is a flat sugar cookie covered with a smooth layer of royal icing. Royal icing dries hard, providing a stable, non-porous surface that prevents the edible ink from bleeding. The surface texture must be completely level; any bumps or ridges will cause air pockets under the icing sheet, leading to a wrinkled appearance.
To achieve a smooth finish, use the flooding technique. Outline your cookie with a stiff royal icing border, then fill the center with a thinner consistency icing. Use a toothpick to spread the icing to the edges and pop any air bubbles. Allow the icing to dry completely. This is non-negotiable. The drying time depends on humidity, but you should wait at least 12 to 24 hours. Applying an edible image to wet or tacky icing will draw moisture into the paper, causing the colors to smear and the image to dissolve.
Moisture control is the single most important factor in this step. If you are using a chocolate or fondant base, the surface must be dry and free of condensation. For buttercream, which never fully crusts, edible images are trickier. In that case, place the cookie in the refrigerator for 15 minutes to firm up the frosting, apply the image quickly, and return it to the fridge to set.
Formatting Your Photos for Edible Printing
Image resolution determines whether your final print looks sharp or pixelated, and the rule of thumb is to use the highest resolution file available. For edible printing, you want a minimum of 300 pixels per inch (PPI) at the physical print size. A low-resolution image pulled from social media, often around 72 PPI, will look blurry and soft when enlarged onto a cookie.
Editing your photo before printing is essential. Crop the image to match the aspect ratio of your cookie template, then adjust the brightness and contrast. Edible ink tends to print slightly lighter than it appears on screen, so boosting saturation by 10-15 percent often yields a more vibrant result. Use a graphic layout program to position your image on a template that matches your cookie dimensions, leaving a small white border if you want the image to stand out from the icing.
Color calibration is another technical hurdle. Your computer monitor displays colors using RGB (red, green, blue), but many printers process images differently. Print a small test sheet first to check the color balance. Skin tones are particularly difficult to match; a test print lets you adjust the magenta and yellow levels before you commit to a full batch.
Step-by-Step: How to Apply Edible Icing Sheets to Cookies
Applying an edible icing sheet is a delicate operation that requires steady hands and precise timing. The process takes about 60 seconds per cookie once your surface is ready. Here is a transfer method that can produce good results.
- Cut the image. Trim the printed icing sheet to within 1-2 millimeters of the printed design. Use scissors for straight edges or a craft knife for intricate shapes.
- Peel the backing. Frosting sheets typically come with a clear plastic backing. Starting at one corner, gently peel the sheet away. If it sticks, place it in the freezer for 10 seconds to make it more pliable.
- Position the sheet. Hold the peeled sheet by its edges with tweezers. Lower it onto the center of the cookie. Once it touches the icing, it will stick immediately, so do not try to slide it.
- Smooth out air bubbles. Use a fondant smoother or the flat side of your finger to press from the center outward. This pushes trapped air to the edges and ensures full contact with the icing.
- Let it set. The edible sheet will absorb moisture from the icing over the next few minutes. It will initially look slightly raised, but it should flatten and blend into the surface as it hydrates.
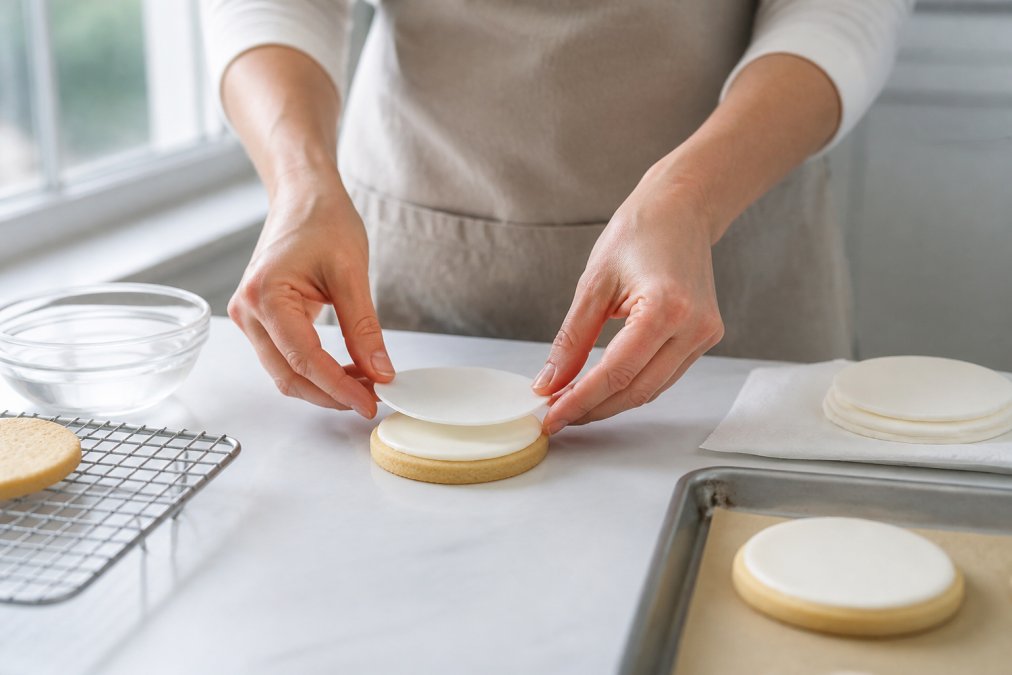
For a polished finish, allow the decorated cookies to dry uncovered at room temperature for at least 2 hours before stacking or packaging. Stacking too soon can cause the images to stick together and tear. If you need to store them, place them in a single layer in an airtight container with parchment paper between layers to protect the surface.
Edible Image Troubleshooting: Fixing Bleeding and Smudging
Ink bleeding is the most frequent complaint among DIY printers, and it usually stems from one of three causes: excess moisture, low image resolution, or over-saturation of ink. When edible ink bleeds, the colors migrate into the surrounding frosting, creating a fuzzy, undefined edge. The fix depends on the root cause.
If the bleeding occurs immediately upon application, the cookie surface is too moist. Your royal icing needs more drying time. If the bleeding appears after several hours, the storage conditions are likely at fault. High humidity causes the icing to soften and the ink to wick outward. Store finished cookies in a cool, dry place and avoid refrigerating them, as condensation will ruin the print.
Smudging during handling is usually a contact issue. The edible ink is water-soluble, so any moisture on your fingers will lift the color. Always handle printed cookies by the edges, and use a dry brush to remove any stray crumbs before applying the sheet. If you see fine lines or banding in the print itself, the printer nozzles are partially clogged. Run a cleaning cycle and print a test pattern to clear the print head.
| Problem | Likely Cause | Solution |
|---|---|---|
| Colors bleeding outward | Icing surface too wet | Extend drying time to 24 hours |
| Smudging on touch | Moisture on fingers | Handle by edges, use tweezers |
| Banding or faint lines | Clogged print head | Run cleaning cycle, test print |
| Pixelated or blurry image | Low source resolution | Use files at 300+ PPI |
DIY Printing vs. Professional Custom Toppers
Deciding between DIY printing and outsourcing comes down to a cost-benefit analysis of your time, volume, and desired quality. A full DIY setup, including a converted printer, edible ink, and starter paper, represents a significant upfront expense. For a single event like a birthday party with 24 cookies, the per-unit cost of DIY is often higher than ordering pre-cut sheets, especially when you factor in the time spent calibrating colors and troubleshooting failed prints.
Professional services offer consistency and a higher ceiling on print quality. When you order custom toppers from SugarPrints by Alexis, your photo is handled by specialists who manage color calibration and use certified edible materials and food-safe inks. The toppers arrive pre-cut, so you skip the printer maintenance and go straight to the peel-and-place step. This is particularly valuable for event planners managing tight deadlines, as it removes the risk of a printer malfunction derailing your dessert table.
FDA food safety guidelines for edible products emphasize that all food-contact materials must be safe for their intended use. Professional providers should be able to confirm that their materials meet these standards. For hosts who are not confident in their design skills, sending a photo to a professional also eliminates the worry of pixelation or poor color matching, as the provider adjusts the file for optimal print quality on a small scale.
Conclusion
Mastering how to print photos on cookies requires attention to surface preparation, image resolution, and moisture control, but the payoff is a dessert that genuinely wows your guests. Whether you choose to invest in an edible ink printer for cookies or prefer the convenience of pre-cut sheets, the techniques above can help you avoid the common pitfalls of bleeding and smudging. For those who want a professional finish without the equipment and troubleshooting, SugarPrints by Alexis creates custom photo toppers using certified edible materials and food-safe inks, with pre-cut options that make decorating simple. Get started with SugarPrints by Alexis and turn your favorite photos into picture-perfect treats for your next celebration.

Frequently Asked Questions
Do I need a special printer to print edible images?
Yes. You cannot use a standard inkjet printer because its ink is not food-safe. You need an edible ink printer for cookies, which uses cartridges filled with FDA-compliant edible ink. These are typically modified consumer printers designed to print only on edible paper like frosting sheets or wafer paper. Never use a printer that has previously held standard ink, as residue can contaminate your food.
How do I apply edible images to cookies without bubbles?
Start with a completely flat, dry cookie surface, ideally covered with royal icing or fondant. Trim the edible icing sheet to fit, leaving a small border if desired. Gently place one edge of the sheet onto the icing and slowly lower the rest, using your fingers or a small offset spatula to smooth it outward. This pushes air out from under the paper, preventing bubbles and wrinkles.
Why is my edible image bleeding or smudging?
Bleeding usually happens when the edible icing sheet absorbs too much moisture. Ensure your royal icing is fully crusted and dry before applying the print. Avoid refrigerating the finished cookies, as condensation will cause the ink to run. Store them in a cool, dry place and serve within 24 to 48 hours for the crispest image quality.
What is the best way to print photos on cookies for a party?
For a large batch, like 40 cupcakes for a kids' birthday party, a professional service offers the most consistent results. DIY printing with an edible ink printer for cookies is great for small batches, but it takes practice to get color calibration and application right. Professional custom toppers, like those from SugarPrints by Alexis, are pre-cut, use certified edible materials, and arrive ready to peel and place, saving you time and reducing waste.
Get started with SugarPrints by Alexis and order custom birthday photo cookie toppers or pet photo cake toppers that arrive ready to peel and place.